戦車兵ガイド
ドイツの戦車
 |
 |
 |
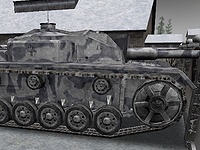
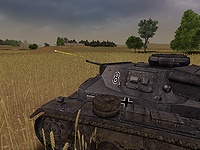
Panzer III
L
独ソ戦開戦時の主力戦車だったが、性能に勝るソビエト戦車に苦しめられ続け、やがて戦場から姿を消した。APCR
弾を撃てるのが唯一の長所。 |
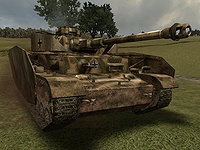
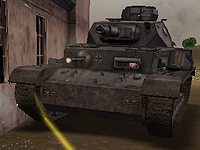
Panzer IV F1
4
号戦車の初期バリエーションを F1 が代表。75mm 短身砲で歩兵を援護する。3
号よりは強力だが、対戦車能力はけして高くない。 |
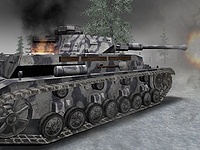
Panzer IV F2
75mm 長身砲搭載の F
型後期モデル。4 号戦車はドイツ戦車部隊の核となって、終戦までを戦い抜いた。主砲は T34/85
と肩を並べるが、装甲では劣る。 |
ソビエトの戦車
 |
 |
 |
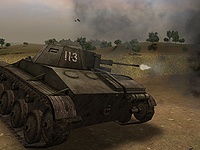
T-60
傾斜装甲で守られた小型戦車。20mm
機関砲は連射できる強力な PTRD ライフルに近い。軽装甲の戦車にとっては侮れない相手。2 人で運用。 |
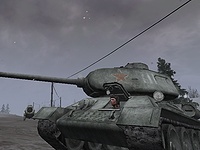
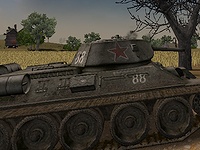
T-34/76
傑作と評される T34 戦車の
76.2mm 砲搭載モデル。独ソ戦初期〜中期に活躍、高い性能と数でドイツ戦車兵を恐怖させた。 |
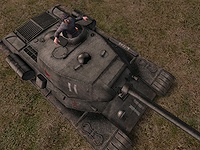
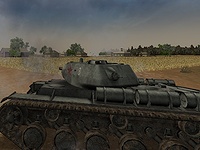
KV-1S
重戦車 KV-1
の装甲を大幅に薄くし、機動力を上げたモデル。主砲、装甲とも T34/76
と似たり寄ったりで、ゲーム中ではあまり特徴がない。 |
先頭へ戻る
戦車の装甲
装甲を貫通するためには: RO
に登場する戦車には、「装甲」という概念があります。たとえ攻撃が命中しても、装甲を貫通できなければダメージはゼロです。単純なHP制ではないため、歩兵銃では戦車に傷をつけることすらできません。貫通できそうもない攻撃は、むしろしない方が得策です。様々な条件を考えに入れて、有効打を狙ってください。
| 貫通判定に使われる要素 |
|
| 砲弾の威力 |
使用する砲の性能、砲弾の種類とサイズにより威力が違います。IS-2 の徹甲弾が最強で、最弱は PTRD Rifle
です。 |
| 距離 |
徹甲弾の飛ぶ速度は、距離が離れるほど低下し、それに伴って威力も落ちます。距離が近ければ近いほど、本来の破壊力を発揮できます。HE
弾とパンツァーファウストには距離の影響がありません(命中の衝撃ではなく弾頭の爆発で目標を破壊するため)。 |
| 命中角度 |
命中角度による貫通力の違いが再現されています。それもちょっと大げさな気がするぐらいです(これがリアルなのかもしれませんが)。
戦車の装甲に対して、90
度(垂直)で命中した攻撃は、最大の威力を発揮します。角度が小さくなるにつれ貫通力が弱まっていきます。だいたいの話ですが、30
〜 40 度以下で命中した場合、どんなに強力な砲弾でも跳弾してしまうようです。 |
| 装甲の強度 |
一般的に、戦車は正面の装甲がもっとも分厚く、側面は薄くなり、背面はさらに脆弱になる傾向があります。車体の装甲は、同じ面の砲塔部分と同等か薄くなります。
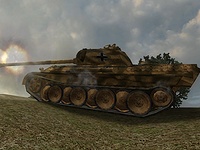
各面の装甲厚と材質は、戦車によって異なります。例えばパンター戦車の正面装甲は極めて頑丈で、KV-1s
戦車の砲撃をほぼ常に跳ね返します。一方 KV-1s より強力な砲を持つ T34/85 なら、250 m以下の距離 90
度で攻撃を命中させれば、なんとか貫通できます。パンターの側面 / 背面装甲は T34/85 と同程度、回り込んで撃てば
KV-1s の主砲でも撃破できます。 |
| 装甲の傾斜 |
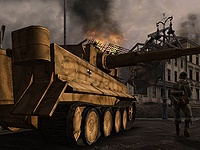
単に厚さ・硬さだけでなく、装甲に付けられた傾斜角度も考慮されています。丸みのあるソビエト戦車の砲塔は、狙いの甘い砲弾の貫通力をたやすく奪ってしまいます。ティーガー戦車の正面装甲は厚さとしては相当なものですが、傾斜がほとんどないため、強力な砲弾が直撃するとあっさり貫通されます。 |
| 装甲の弱点 |
戦車にはそれぞれ特別に装甲の薄い部分があります。具体的な場所はよくわかりませんが、操縦手席の窓や、車体と砲塔の繋ぎ目などが該当するようです。 |
| ハッチ |
操縦手がハッチを開けている場合、そこに命中させると無条件で貫通します。操縦手はもちろん助かりません。 |
貫通後のダメージ:
最終的に、貫通力が装甲の防御力を上回れば、ダメージを与えられます。そうでなかった場合、攻撃は弾き飛ばされてしまいます。貫通した砲弾がどのような経路で戦車内部を進むかによって、与えるダメージも変化します。つまり命中させること、貫通させることだけでなく、特定の部位をうまく狙うことも必要になります。
| ダメージの種類 |
|
| エンジン |
エンジンは車体後部中央にあります。エンジンがダメージを受けると機動性が低下し、完全に破壊されると移動不能になります。 |
| 弾薬庫 |
内部の弾薬ラックに被弾すると、戦車は即座に爆発します。 |
| キャタピラ |
側面からの攻撃が、車体底部の転輪部分を貫通すると、キャタピラが破壊されます。車体へのダメージは軽微ですが、一切動けなくなります。転輪が空回りする独特の音がするので、すぐにそれとわかります。修理手段はありません。足回りの破壊を狙う際は、必ず側面から、接地部分の少し上を狙って撃つといいでしょう。 |
| 内部構造 |
上のいずれにも命中しなかった場合、かわりに戦車内部の装置などが破壊されます。このダメージは累積します。現在の内部ダメージは、HUD
左の戦車イメージの色で判別できます(白=無傷、黄色=損傷、赤=危険)。戦車は大抵 2
発の貫通弾で機能停止します(撃破)。 |
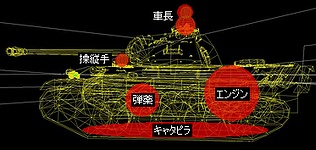
戦車のどの位置に何があるかは、公式サイトで公開されている データシート
をご覧ください。
 |
 |
| パンターで 4
号戦車の車体側面を至近距離から砲撃。凄まじい威力を持つパンターの主砲でも、角度が悪ければ容赦なく弾かれてしまう。 |
パンター戦車側面の当たり判定。車長とドライバーの当たり判定は、ハッチを閉めれば消える。戦車の側面下部には、かならず足回りへの当たり判定がある。弾薬庫とエンジンの位置は戦車によって違う。 |
先頭へ戻る
スペック一覧
装甲: 車体の装甲厚(mm) - 傾斜角 / 砲塔の装甲厚(mm) -
傾斜角
主砲: おおまかに威力をレーティング
(10/10)
砲塔旋回: 360度回転に要する秒数
| |
前面 |
側面 |
背面 |
上部/底部 |
最高時速 |
主砲 |
リロード |
砲塔旋回 |
乗員 |
登場年 |
| 3号戦車 |
30-9/30-15 |
30-0/30-0 |
30-30/30-0 |
17-90/12-90 |
31km |
3 |
7秒 |
17秒 |
3 |
1941/12 |
| 4号戦車F1 |
50-12/50-11 |
30-0/30-26 |
20-9/30-16 |
10-90/10-90 |
30km |
4 |
9秒 |
25秒 |
3 |
1941/4 |
| 4号戦車F2 |
50-12/50-11 |
30-0/30-26 |
20-9/30-16 |
10-90/10-90 |
30km |
7 |
10秒 |
25秒 |
3 |
1942/3 |
| 4号戦車H |
|
|
|
|
|
|
|
|
|
|
| パンター |
80-55/110-11 |
40-40/45-25 |
40-30/45-25 |
16-90/16-90 |
30km |
9 |
13秒 |
15秒 |
3 |
1944/3 |
| ティーガー |
100-10/100-8 |
80-0/80-0 |
80-8/80-0 |
25-90/25-90 |
29km |
8 |
15秒 |
60秒 |
3 |
1942/7 |
| Stug III |
80-10/80-0 |
30-0/30-11 |
50-0/30-0 |
16-90/15-90 |
29km |
7 |
7秒 |
左右10度 |
2 |
1942/3 |
| T-60 |
15-70/25-25 |
15-0/25-25 |
25-14/25-25 |
10-90/10-90 |
34km |
2 |
12秒 |
15秒 |
2 |
1941/6 |
| T34/76 |
45-60/52-0 |
45-40/52-30 |
47-42/52-30 |
20-90/20-90 |
40km |
5 |
13秒 |
14秒 |
3 |
1941初期 |
| KV-1s |
75-30/82-15 |
60-0/75-15 |
60-10/82-15 |
40-90/30-90 |
25km |
5 |
12秒 |
30秒 |
3 |
1942初期 |
| T34/85 |
47-60/90-0 |
45-40/75-20 |
45-48/52-10 |
20-90/20-90 |
40km |
7 |
12秒 |
15秒 |
3 |
1944/3 |
| IS-2 |
120-60/100-0 |
90-15/90-18 |
60-49/90-30 |
30-90/20-90 |
25km |
10 |
20秒 |
30秒 |
2 |
1943/12 |
| SU-76 |
25-60/25-20 |
15-0/10-20 |
15-0/なし |
7-90/なし |
29km |
5 |
6秒 |
左右15度 |
2 |
1943/1 |
戦車クルー
戦車に乗れるのは、戦車兵と戦車将校クラスだけです。Use キー [Z] で乗車 / 降車し、乗り込んだ後は数字キー [1 、2
、3 …] でポジション(席)を移ります。
- 敵の車両を奪うことはできません。
- 戦車の定員は 3 名ですが、1 人でも運用はできます。ただし 2
人以上乗った戦車に比べ、いくつかハンデを負うことになります。もっとも困る点は、移動と射撃が同時にできないことです。
- ベースに止めてある戦車に最初に乗り込み、さらに周囲に味方の戦車兵がいる場合、Waiting for
Additional Crewmembers
(他のクルーの乗車を待っている)と表示が出て、しばらく発進できません。
- すでにダメージを受けている車両は、乗員が脱出すると即座に爆発します。無傷のものは、しばらくその場に残ります。乗り捨てを繰り返すと、ベースの戦車が足りなくなります。
車内のコミュニケーション: 同じ車両のクルーのみに伝わるチャット [U]
と専用のボイスが用意されています。ボイスのほうは、通常のボイスメニュー [V] から使うほか、すでに Num
キーパッドに一通りバインドされています。例えば Num5 キーで「止まれ」、Num0
キーで「敵が後方にいる!」とクルーに叫びます。これらは主に、車長が操縦手に指示を出すため使われます。
先頭へ戻る
Driver: 操縦手 (1 キー)
車体前部の操縦席で、戦車の動きをコントロールします。わずかな視界と音だけを頼りに、周囲の状況を正確に掴まなくてはいけません。上手な操縦手は被弾確率を大幅に減らし、装甲の効力を何倍にも増幅させ、さらには射撃の精度を高めます。操縦手の腕で戦車の力のほとんどが決まる、と言っても過言ではないでしょう。
 |
 |
 |
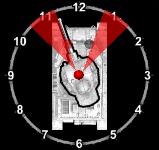
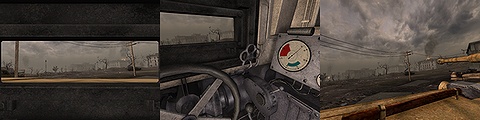
| 操縦手用の HUD
。戦車イメージの色は内部へのダメージ量を表す。エンジンやキャタピラが破壊されると、その部分が赤くフラッシュする。スロットルはプラス(上)で前進、マイナス(下)でバック、ゼロで停止。速度と回転計はそれほど意味がない。 |
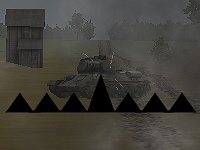
敵に対する角度は、戦車戦でもっとも重要なファクター。赤で塗られた方角に敵を置くと、装甲が最大の効果を発揮する。 |
ハルダウン状態で獲物を待ち受ける 4
号戦車。戦車の性能差も工夫次第で克服できる。 |
操縦: W/S キーでスロットル調整、A/D キーでハンドルを切ります。ブレーキをかけたいときは Jump キー
[Space]。スロットル操作に慣れられない場合は、オプションから一般的な操作(W/S
で前進後退)に変更できますが、低速で滑らかに前進することが難しくなります。
視点: マウスホイール上下で 3
つの視点を行き来できます。
窓に顔をくっつける ←→ 操縦席
←(ハッチ開閉)→ 操縦手ハッチから身を乗り出す
視界を確保するために、普段はハッチを開けて操縦し、危険が迫ったら、閉じて窓に顔をくっつけると、操縦しやすいかと思います。ただし開いたハッチには銃弾が飛び込んでくるだけでなく、戦車砲に対しても弱点となります(特にソビエト戦車)。閉めるタイミングを見誤らないようご注意ください。
砲手との連携:
敵を先に発見するのはたいてい車長ですから、彼のチャットやボイスに注意する必要があります。攻撃時は必ず停止し、砲手に狙い撃つ余裕を与えましょう。移動しながらの砲撃は滅多に当たりません。射撃と射撃の間は、身を隠すか、移動し続けるのがもっとも安全です。ただ、砲手が毎回索敵と照準をやり直す羽目になるため、喜ばれない場合もあります。
昼飯の角度:
敵の視界内で停止する場合、敵にどの面を向けるかで生死が決まります。背中を見せないこと、側面よりも正面を向けることはもちろんですが、さらに敵弾が垂直に命中しないように、車体に角度を付けてください。正面斜め、HUD左下の時計で
11 時、1 時ぐらいの方向に敵を置くと、ちょうど良いようです。これは実際にも使われた戦法だそうです。RO での一般的な交戦距離は
100m 〜 500m
、この距離では重戦車の厚い正面装甲すら、じゅうぶんな防御力が期待できません。適切な角度を付けない限り、格下の戦車の主砲にも貫通されてしまうでしょう。
ハルダウン:
戦車の砲塔は車体に比べサイズが小さく、装甲が厚く、しかも丸みや傾斜によって跳弾確率が高くなります。ハルダウンは、この砲塔だけを敵に晒して、弱い車体部分を地形の起伏などに隠してしまう戦法です。ちょうど操縦手席の窓を覆う高さの遮蔽物を探し、密着して停車してみてください。戦車の防御力を大幅に高めることができます。
ターレットダウン:
ターレットダウンはもっとも安全な索敵方法です。敵の出現が予想される地点から見て、砲塔までぎりぎり隠れる高さの起伏や遮蔽物を探します。戦車が完全に敵から見えない状態で、車長が砲塔ハッチを開けて身を乗り出し、双眼鏡で索敵します。
射界の制限:
主砲を上下に動かせる範囲は限られます。勾配の途中で停車すると、車体が邪魔になったり、砲を向けられなかったりで、砲手が敵を撃てない場合もあります。また機銃手席に誰かが座っている場合、彼の機銃は車体正面にしか撃てないことも忘れないでください。
先頭へ戻る
Cmdr: 砲手 / 車長 (2 キー)
砲手と車長は兼任です。車長は、操縦手のかわりに戦術マップで情勢を把握し、移動経路を指示し、戦車の目となります。敵を発見したら、砲手となって主砲の照準と射撃を担当します。車両クルー用に用意されたボイスをどんどん使いましょう。何を考えているかわからないと、操縦手が不安になります。
 |
 |
 |
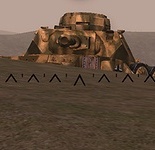
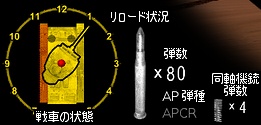
| 砲手用の HUD 。上の例では、左のキャタピラが破壊され移動不能、現在の使用弾は AP 、残り
80 発。砲弾イメージが真っ白なので装填完了状態。APCR 弾に変更可能。 |
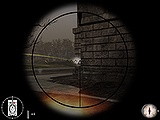
きちんと距離を調整すれば、照準器の三角の頂点(一部の戦車では十字の中心)に正確に砲弾が飛んでいく。 |
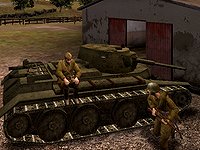
4
号戦車のキャタピラを破壊。命中時に小さな爆発が見えたら貫通した証。車体側面の転輪部分を貫通させれば、キャタピラを破壊できる。 |
視点: マウスホイール上下で 4
つの視点を行き来できます。双眼鏡は将校クラスの使うものと同じ機能を持っています。
主砲照準器
←→ 砲塔内(キューポラ)の小窓 ←(ハッチ開閉)→
車長ハッチから身を乗り出す ←→ 双眼鏡

戦車戦では先に敵を発見したほうが優位に立ちます。歩兵に狙撃される危険を考えても、ハッチから体を出して、双眼鏡で 360
度を索敵するほうが、結局安全かもしれません(特に砲塔回転が遅い戦車)。周囲の警戒を、一方向しか見えない主砲照準器のみに頼るのは、とても危険です。
主砲照準器:
中央三角の頂点が照準です(一部のソビエト戦車は十字の中心)。超遠距離では目標少し上、目標が動いているなら移動方向少し先を狙う必要があります。
距離の調整: Lean キー [Q/E] で、主砲の着弾距離を調整できます。例えば 300m
先の目標を撃つ場合、通常は落下を考慮に入れて少し上を狙います。しかし着弾距離を 300m
にセットすれば、後は照準を目標に合わせるだけです。ドイツ戦車は 100m
単位の緻密な設定が可能ですが、ソビエト側は大雑把にしか調整できません。
主砲のリロード:
戦車の主砲は一発撃つごとに重い弾を手動で込め直さなければいけません。そのためリロードに長い時間がかかります。リロード作業は砲手席に誰もいないとストップします。クルーが
1 人しかいない場合、この点が大問題になります。
弾種の変更: 主砲から撃ち出す弾には 3
タイプあります。どれをどのぐらい積んでいるかは戦車によります。現在装填してある弾は明るい文字で、装填予定の弾は <-
で示されます。Fire Mode キー [X] を押すと、次に装填する弾を切り替えることができます。
AP (Armor Piercing 徹甲弾)
戦車の装甲を貫くための金属のつぶて。距離に応じて威力が落ちる。歩兵に対しては直撃させない限り効果がない。 |
APCR (Armor Piercing Composite Rigid 硬芯徹甲弾)
特殊な材質を使った徹甲弾。同サイズの AP
弾より軽いため、撃ち出される速度が速い=貫通力が高い。かわりに距離による威力と精度の低下が激しい。歩兵に対しては直撃させない限り効果がない。 |
HE (High Explosive 榴弾)
命中と同時に爆発する砲弾。被害は広範囲に及ぶ。遠距離でも破壊力は不変。主に歩兵や軽車両相手に使われるが、戦車に対しても多少の効果はある。特に
IS-2 の HE 弾は強力。 |
同軸機銃: 主砲と同じ向きに据え付けられた機銃(同軸機銃)も利用できます。Alt Fire キー [右クリック]
で発射します。機銃弾は、砲塔の右脇から飛び出します。したがって至近距離の敵を撃つ場合、照準を少し左に合わせる必要があります。

距離を測る:
主砲の着弾距離を調整するとき、敵までの距離をどう測るのかが問題となります。経験と勘で割り出す以外にも、ある程度正確に測る手段が用意されています。
- まず敵戦車の車体の大きさを覚えます。例えばパンターは大雑把に縦 9m 、横 3.5m 、高さ 3 mです。 各戦車のサイズは
History and Tactics Guide に記載されています。
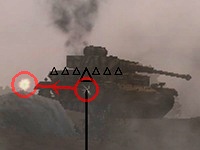
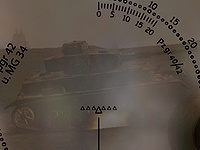
- 車長席のハッチを開け、双眼鏡の目盛りで敵戦車を捉えてください。
- ^ と ^ の間は 16 ミル、^ と | の間は 8
ミルです。戦車の車体が何ミルに見えるか数えます。上の場合はパンター側面を目盛りに合わせると 8 × 5 で 40 ミルと出ました。
- 1000m では 1 ミル= 1m
500m では 1 ミル= 0.5m
400m では 1 ミル=
0.4m
250m では 1 ミル= 0.25m
実際の車体サイズを 3 の値で割って、答えを 1000
倍すれば距離がわかります。9m のパンター側面が 40 ミルに見えたので、9 ÷ 40 =
0.225。ということで、この場合の距離は約 225m です。
目安としては、戦車の正面が最小目盛り(8 ミル)以内に収まっている場合、たいてい 400m
以上の距離があります(側面は 16
ミル以下)。主砲照準器の三角の目盛りも同じ役割を果たすはずですが、こちらは見方がわかりません。
先頭へ戻る
MG: 機銃手 (3 キー)
 多くの戦車は、車体前方に向けられた機銃(車体機銃)を搭載しています。機銃手の仕事はこれを操作すること。視界は車体の向いている方角のみに限られ、ハッチ開閉や視点移動はできません。ドイツ戦車の車体機銃はシンプルな照準装置を使って射撃します。ソビエト戦車の場合、特にそういったものはありません。 多くの戦車は、車体前方に向けられた機銃(車体機銃)を搭載しています。機銃手の仕事はこれを操作すること。視界は車体の向いている方角のみに限られ、ハッチ開閉や視点移動はできません。ドイツ戦車の車体機銃はシンプルな照準装置を使って射撃します。ソビエト戦車の場合、特にそういったものはありません。
歩兵の少ない戦車マップでは、他のポジションに比べ重要度の落ちる感があります。ベースに戦車が余っているなら、1 両の戦車に 3
人が乗り込むよりも、2 人と 1 人に分かれ 2 両で攻めた方が得策かもしれません。それでも 3
人目のクルーの存在により、警戒の目が増え、さらには天敵である対戦車歩兵を一切寄せ付けないという意義はあるでしょう。
固定砲塔
固定砲塔の戦闘車両(突撃砲、自走砲)は、前方わずかの範囲にしか砲を向けられません。操縦手と砲手の連携を密に取らない限り、射撃することすら不可能です。車体に角度をつけて攻撃を弾くこともできないので、砲を向けられたら逃げた方がよいでしょう。こうした欠点のかわりに、素早いリロードで続けざまに砲弾を浴びせられるという大きな利点があります。
輸送 / 偵察車両
基本的なシステム、操作は戦車と変わりません。違いは誰でも乗れること、乗客というポジションがあること [数字キー 3 〜
8]、装甲が薄いため、歩兵銃や手榴弾でも(弱い部分なら)ダメージを与えられることです。
 |
 |
 |
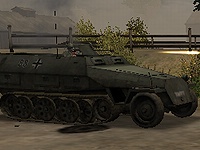
SdKfz
251 Half-track
MG34 機関銃を積んだドイツの半装軌車両。クルー 2
名、乗客 6 名。戦車が登場しないマップでは厄介な相手。ドライバーはハッチを開け閉めできる。 |
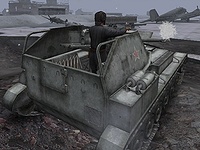
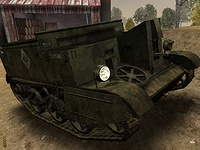
Universal
Carrier
イギリス製のキャタピラ式装甲兵員輸送車。ソビエト軍用。最大で兵士 6
名の足となるが、鈍重で図体が大きいため、破壊されやすい。走行音がうるさいのも難点。 |
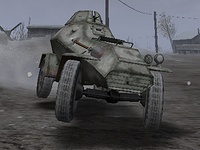
BA-64
ソビエトが使う 2
人乗りの偵察車両。ハイスピードで疾走できるかわり、気を抜くとすぐ横転する。機銃も撃てるが、戦闘用としてはあまりに非力。機銃手は頭を上げられる。 |
| |
前面 |
側面 |
背面 |
上部/底部 |
最高時速 |
主砲 |
乗員 |
登場年 |
| Sdkfz 251 |
15-22/10-33 |
8-35/8-35 |
8-33/8-33 |
6-90/なし |
36km |
機関銃 |
2+6 |
1942/1 |
| Universal Carrier |
|
|
|
|
|
機関銃 |
2+4 |
|
| BA-64 |
15-40/10-30 |
9-30/10-30 |
9-30/10-30 |
4-90/なし |
45km |
機関銃 |
2 |
1939/6 |
対戦車砲

先頭へ戻る
ソース
戦車のダメージモデルと装甲貫通システムに関しては、TW 社開発スタッフのフォーラムへの書き込みと、UT2004 Mod
時代の情報を参考にしています。自分で確かめたものもありますが、ほとんどは本当にそうなのかどうかよくわかりません。例えば現在の
PTRD ライフルや損傷したエンジンの扱いは、Mod
時代から変更されたようで、スタッフの書き込みとも矛盾しているように思えます。最近の書き込みでは、一部に問題があることを彼らも把握しており、今後に渡って修正していくつもりだ、とのことでした。
※こうした問題点は、v1.008 パッチにて修正されました。
Ramm-Jaeger 03-15-2006
08:39 PM
Ok,
As the guy that actually coded the armor system let
me lay to rest all the speculation. Here is how tank shell
penetration and vehicle damage works:
1) When the shell hits
the armor, a calculation is done to determine if the shell
penetrates the tank or deflects (doing no damage).
2) To
determine penetration, several factors are taken into account:
-
Shell mass and composition (HE, AP, APCR, etc)
- Shell
velocity
- Angle of impact, and armor angle at the point of
impact
- Armor thickness, slope, and armor type.
3) Once
the shell penetrates the tank, there are key areas INSIDE the tank
than can be damaged. These include the engine and ammo storage.
- An engine hit can disable the tank but not destroy it
necessarily.
- An ammo storage hit will cause the tank to "flame
up" and it will be destroyed.
Penetrating hits that do not hit
any key elements inside the tank will do overall damage to the tank
and when the tank has receieved too much damage the tank is
inoperable and is destroyed. (Yes we could just leave the tank
sitting there, but that would lag out the servers and the clients
once you got several dozen destroyed tanks just lying about the
battlefield).
Regarding penetration of walls by tank rounds
or bullets. Yes this is realistic, and yes it is something we would
like to have. But just because it was in a game like CS doesn't mean
it is feasible for this game. In games like CS you have instant hit
weapons. That means they do a laserbeam like trace to see if they
hit something. This is very CPU efficient, but not very
realistic.
In RO:Ostfront, every bullet fired has realistic
ballistics. That means travel time, drop over distance, etc. This
give a very realistic feel to the weapons and using them. The side
effect is that it is more CPU intensive than hit-scan weapons. For
us it was worth the trade off. Adding penetration for full ballistic
rounds would be very CPU intensive, and is something you MIGHT see
in the future in Ostfront, but it wasn't something we added for the
initial release.
Regarding the effectiveness of the Tiger,
or any other tank in the game. All of the game's armor ratings, tank
shell effectiveness, etc were taken from reliable sources such as
British Intelligence reports and information from the military of
the former Soviet Union. There are lots of tanks (Such as the Tiger)
that have a popular mythos surrounding them. But when you plug in
real world data, and put them up against other late war tanks, the
Tiger is often found wanting.
Could the tiger own Shermans
and early war Russian tanks? Absolutely. Did it have a great main
cannon? Yes of course. But it was also heavy, had non sloped armor,
and its main turret rotated PAINFULLY slow. This made it fairly
effective in the defensive role (which is was used for primarily on
the western front, which earned it its reputate as a great tank) but
also made it perform quite poorly on the Eastern front where it was
used in an offensive role against late war Russian tanks.
Now we could debate sources of information ad nauseum.
Everyone source has slightly different information. Each official
source tends to slant their information toward thier own countries
tanks. Which is why we took a broad sampling and compared our data
with both theoretical and real world data. Will there be sources
that contradict our data? Absolutely. But we used the best
information that we have, and our research was thorough.
Finally, will there be instances where we "got it wrong"?
Almost certainly. And please feel free to point out elements of our
armor system that don't seem right in an intelligent and well
researched manner and we'll gladly take a look at them and make
adjustements. But just to be quite frank, throwing a bunch of
figures you cut and pasted out of a book into the forums and then
saying "look Tripwire got this wrong, thier whole game must not be
realistic" just isn't going to cut it.
Ramm-Jaeger 03-02-2006
05:17 PM
Anyone asking questions please be aware that a lot of the answers
poeple are giving are from the mod version of RO. Most of the time
thier right, but unless that person answering is a dev (like myself)
or a beta tester, they won't really know the exact details of the
retail game.
Anyway, in Ostfront you can kill either the
driver or the tank commander if their hatch is open by shooting them
with small arms. Additionally, if a driver has thier hatch open and
a tank shell hits that area, it will fly right in through the hole
and be an instant penetrating shot (killing the driver and
potentially destroying the tank).
As far as damage modelling
goes, first your shot has to penetrate the tank armor. There is a
sophisticated ballistics/armor penetration model that uses shell
velocity, shell hardness, shell mass, armor thickness, angle the
shell hits the armor, etc. to determine if the shell penetrates the
tank.
Once the shot penetrates, it can hit internal
components of the tank such as the ammo storage or the engine.
Hitting the ammo storage blows the tank sky high with 1 hit. Hitting
the engine can disable the tank from moving, although it can still
shoot its cannon. Also hitting the bottom part of the tracks can
disable the tank even without penetrating.
Regarding player
damage, all damage is locational and there is an advanced hit
cylinder system that almost perfectly matches the shape of the
player. Losing a limb is guaranteed death.
SasQuatch
03-29-2006, 09:50 PM
We have tested the tiger extensively, because after initial
implementation in our maps, we too thought the tiger was
'weird'.
We've taken pot shots at tigers from many distances
on arad with T34/85's and vice versa. We've put our findings against
the data we have, and from what i can see, it's correctly modeled as
far as our current models can take it (we dont have a molecule
perfect modeling of armor, but what i get from Alan, we plan on
making the models even more extensive). We knew people would be
screaming hell about the Tiger, but we ran with it anyway, since it
is correct as far as we know.
The main disadvantage we have
is mapsize/distances. I can compare it to the Mod's infantry against
most Ostfront infantry battles. In the Mod distances could be so
small in a lot of the Mod maps, even nades and bullet balistics
seemed weird. If you compare the core gameplay on Konigsplatz for
instance, you can actually see the various weapons function to their
properties, so propper even, that i hear sappers scream for a rifle
instead of the default loadout
It's a hard bargain: either
we model the tanks unrealistically to counter the 'short range' map
sizes we can make (<1000m tops at some odd spot), and up their
armor specifics and downgrade their ballistic capabilities to suit
the max size maps we have going, OR we make the tank maps even
bigger, with larger view distances, even less detail, and having 32
players max on 3x3 km maps killing the servers and your computer and
the fun; neither options are good for us.
There is 1 map
where the tiger meets T34/76's. Due to the scenario's at hand, we
ended up with mostly late war tank maps, the only map where there's
T34/76 and 85's up against tigers is Ogledow. So please, go test
with T34/76's and the tigers there. The only problem there is that
the map is fairly small. I'd say test it from left to right, you
should be able to fire long range shots in that direction. Make sure
its the 76 though, it's got a smaller turret.
We will
probably visit earlier war tank engagements in the future, where the
tiger will live up to it's 'hype', meaning, it will be meeting early
war russian tanks.
But still, it's not the machine that makes
the killer, it's the operator. I can do pretty well on a Tiger on
Arad, as long as you use it as a 'rifle' and not an 'smg' Your key
asset is your driver, and that goes for almost all the tanks in
Ostfront. Good driver > Good Armor.
[RO]Wilsonam
03-26-2006, 06:56 PM
I'll pick on your response cos its nice and detailed
1. Of course the vehicle damage model isn't perfect yet - we only
model a small number of "critical" locations within each vehicle at
this time. We only model a small number of "weak" points in each
vehicle's armour...
2. Be very careful of "empirical" tables, especially German data.
If you dig into the relevant intelligence files, you'll find that
different armies/nations used different penetration criteria - and
they are NOT consistent! For once, the Germans are quite sloppy on
their measurements - the Soviets were far more rigorous in their
testing. Fortunately I have had access to British, German, US and
Soviet empirical data. It has taken me about 12-18 months of
hunting, collating and then "sanity-checking" to get a believable
and consistent set of data. The same goes for reading tankers'
memoirs... they have wonderful memories
3. AP rounds don't "bounce" - they "glance off": very important
difference. Depends entirely on the angle of impact. An 88mm round
is quite capable of glancing off if it hits at the wrong angle.
4. There are NO recorded cases of a round lifting a large turret
off a tank that I can verify. Do the momentum calcs - a 5Kg
projectile hitting a 15,000Kg turret is NOT going to knock it off.
Conservation of momentum says that the 5Kg round, travelling at
1,000 m/s will force the 15,000Kg turret to move at 0.3 m/s. No - it
won't lift off without a significant amount of energy being
generated somewhere! It needs an internal explosion...
5. There is no such thing as "guaranteed" penetration at any
range... empirical data has the Panther's 7.5cm KwK/StuK 42 L/70
penetrating nearly 200mm of armour at 30 degrees at 100 metres - but
the round still failing 30% of the time.
6. PF didn't generate a large pressure wave - they are far too
small. They actually injected a small stream of super-heated metal
or fractured the armour at the impact area. Modern HEAT rounds can
do it - but they are a LOT more powerful.
7. Artillery fire is quite capable of damaging a vehicle. High
angle, large lump of explosive. Perfectly acceptable to shift an
enemy tank by shelling it, if you have the resources. A (lucky)
direct hit could be catastrophic.
8. There is no "cumulative damage" or HP system for the vehicles
themselves - but the engine/drive train can most definitely take
"damage".
Anyway - yes, the damage model will certainly be upgraded as we
go. We'll work out what are the most "worthwhile" changes to do.
Certainly fun little bits like more interior damage calcs (optics
getting misaligned, drive train damage, crew wounding)... more
complex armour ballistics calcs... spalling, overmatch/undermatch
effects... collateral damage... and so on!
To some of the other points: you can't just "invent" the physics
without the empirical data to model. It just ain't that simple...
the BH numbers of the armour, quality of rounds fired and everything
else come into play.
And (whoever it was) - don't be a complete numpty and tell us to
"search the internet" for the data. We exhausted that route a while
ago - hence the delving into the bloody intel archives for
corroborative data!
At this time, we don't model every single plate on a tank - go do
a count and you'll realise how insane it would all get. We'll have
to continue optimising the engine for this before we can really
handle the 20-40 individual faces of each vehicle!
To all and sundry: just be careful about reading tankers' memoirs
(on both sides). They have a tendency to exagerate, just like
fighter pilots
Anyway - bottom line: we'll go on improving the damage models...
we'll go on monitoring the actual effects, as we've found that some
of the calcs derived off the empirical data do give some unexpected
results... And, finally - NO, nowhere in the game have we messed
about to "artificially" balance different vehicles! The Panther WAS
a complete brute... the Tiger I WAS vulnerable to Soviet guns by
1944 (but not to the Western Allies). And there is at least one
mistake in there that I've spotted and we'll square away in a patch
Yoshiro 02-17-2006
12:29 AM
Hitting different parts of the tank does count for something. All
tanks in game have their armor and slope of said armor calculated
in. When a shell or anti tank weapon hits that armor it checks if it
bounces off, penitrates, hits a vital location such as ammo store,
hits a non critical location such as treads, and several other
points. Each tanks has it's weak points modeled so shells have a
greater chance of penitration if you hit certain areas, and much
less if you hit sloped strong armor with weaker shells.
先頭へ戻る |